New Project!
I have landed my first big project here in the UK! While I’ve been here just over a year, I’ve found it challenging to get things rolling. However, I believe in getting help where I need it (no one is an expert in everything) and I was lucky enough to stumble across Polly from Camberyard in a magazine. A business development consultant for interior designers and brands, Polly helps people like me to build and grow their business – she has also runs the Camberyard Collective, a great network of creative professionals.
Putting the systems in place
Polly made sure I covered the important aspects of my business and, crucially, that I really knew my USP. In a way, I have felt lucky not to have had a big project in my first year here. It has given me a chance to build up relationships with people who support my business – people like marketing consultants, copywriters and accountants but also those I need to know when I have clients, such as suppliers, architects or other interiors professionals. Moreover, I have been able to put my processes in place and, in general, prepare myself for when a big job kicks off.
I am constantly evolving and adapting my working habits, but it helps to have a solid foundation to build on. For example, for social media, I write all my own posts, blogs, guides and microblogs but I get help perfecting them from copywriters, designers and a social media company who knows when to post them and when to push them along with ad spend. Social media is extremely time consuming and if I hadn’t worked out an efficient way to manage it before becoming busy I don’t know how I would have gotten on top of it!
Why a diary?
I have decided to write this diary as I think an ‘in-the-moment’ record is a good way to share the ‘imperfect’ process of a project. After all, my interior design ethos is ‘perfectly imperfect’, celebrating buildings, objects and furniture that have grown more beautiful with age, so by documenting the actual design process, I can also illustrate how the less shiny parts ultimately contribute to the ‘final’ product, acknowledging, of course, that people and interior designs are always evolving.
That said, when I start a new project, I still have a ‘perfect’ scenario in my head. There’s a benefit in that vision – firstly, it forms the basis of the design plan; secondly, it gives me a clear plan or benchmark to break from if needed. As interior designers, and as humans in general, we need to be flexible. Projects and life rarely pan out perfectly and we need to be prepared and be resilient. For me, with this particular project, my original plans were thrown by the coronavirus pandemic. Also, the project scope kept growing, creating more and more pressure to start the implementation phase sooner than I’d anticipated.
Interior Design Process
For those of you who don’t know me, I have two stages to my interior design process. Before either, I try to meet with my potential client a few times to get to know them, the project, timeline, budget and scope of work. I also talk the clients through the way I work and explain my terms and conditions. Only after those initial meetings, if we’ve both decided that we want to work together, do we enter into a business agreement.
Design and Implementation
The design stage is first, followed by the implementation stage.
I split the design stage into three phases. First, I research and think about the look and feel of the rooms and get a sketch artist to visualise my ideas on paper. With this sketch in hand, I can then discuss with the client where we want to go and what mood to create. In this stage I’m already looking at possible colours or finishes for the walls. I might even find details that I would like to use in the project itself, but the main idea is to start the conversation and make sure the design is going in the right direction. From there I start researching furniture, bathrooms and kitchen fittings, soft furnishings, art and accessories to create the desired mood. I use the floorpans that I will have either received or produced at the beginning of the project to create furniture plans. These help me see if things fit and work but also help the client visualise how things will look. After each phase I give a presentation, where possible creating mood boards to show the client the look and feel of the finishes and how they will look in contrast to the wall colours. In the third phase of the design stage we make final amendments and have a meeting before going into the implementation phase.
The implementation phase is mainly ordering everything we have chosen in the design phase, planning deliveries, and overseeing building work. If you imagine the Design Stage as when all of the furnishings, fixtures and fittings get chosen, analysed and ready for ordering, then the Implementation Stage is when you click the ‘order’ button and ensure everything arrives and goes into the right place! It is, of course, a bit more complicated, but that’s the gist 🙂
Background to the project
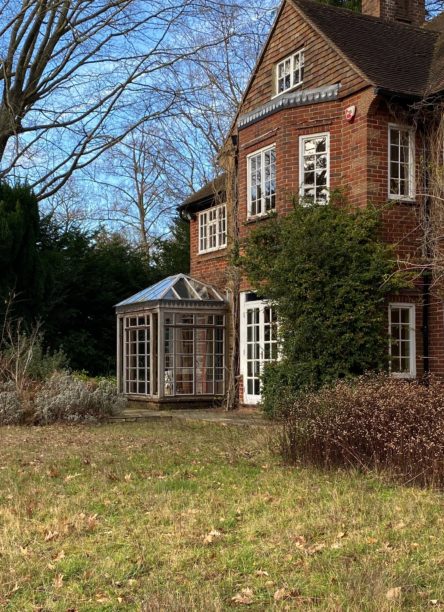
So here I am – the project is a home renovation in Weybridge, Surrey. The brick house, a little under 500 square meters, sits on a 1.77 acre plot of land with great views over a golf course. It has been empty for two years, and was in fact on sale with building permission granted to demolish it and build something new. Although the house is incredibly charming, it wasn’t very well built and was last renovated 20 years ago. The clients have decided to give the house a new lease of life – they are keen to fix what is needed, give it a facelift, but reuse all that is possible. I love the house’s brick facade with vines growing all over it. It feels like a home with real character and the gardens are amazing. All we have to do is make it work again 🙂.
The clients are basically happy with the layout of the rooms and would mainly like to update the kitchen, some fittings of the bathrooms (for example, taps have separate hot and cold outlets) as well as painting the walls. There are a lot of little items, however, that I could immediately see would have to be updated. For instance, the room that used to be the library will be the daughter’s room, a spare guest room will be turned into a shower room, and a recreation room for adults will be turned into a children’s playroom.
Timeline expands
When first presented with the project I honestly thought two months would be sufficient. I had the foresight to make it three, which meant building works should start the 1st of May. However, with the rapid advancement of COVID-19, I started getting nervous and had to throw my Design phases out of the window. Phase 2 of the Design, for example, has still not finished and I am having to start the building phase next week. Furthermore, the family is moving from South Africa, so with flying or sending items out of the question, I have been unable to meet them face-to-face or show samples. We’ve had to make do with video calls; however, pretty early on in the pandemic, when it was clear we were headed for lockdown, the client agreed that full project management was going to be needed, as well as a lot of trust and patience! I would be the principal designer on this project as well as take care of the legalities around CDM regulations. Thank God for a good team!
Where I’m up to
- Floorpans and Elevations created with a designer who is fast at AutoCAD. I can use the programme and think it’s important for me to be proficient in it, but as I’m not an expert, I leave the essential work of making the plans to someone who does it day-in-day-out. I would end up costing a fortune if I tried to do it all by myself!
-
I had various site visits to make a list of changes I thought necessary and to also get a feel for the house. I had telephone conversations with the client about my findings and made little presentations over video conferencing to keep her in the loop.
-
I researched possible construction companies who could do the job and had meetings and conversations with them. I finally decided on one I thought would best suit the client and carried out the background checks.
-
When the client gave a preliminary ok to my list of desired changes, I asked the construction company to start working on the quote. The client did not have a specific budget but the works quote is the most important as it will give an idea of where the final number will land.
-
I started my design with the wall colours – this creates the basis of the whole interior design for me. I made an intuitive sweep through the house thinking of the colours my client has expressed she likes and thinking about where I would put what. I usually think of two or three variations as ideas develop, and when I order the samples I need to keep an open mind.
-
Once I had my samples, I started painting. I usually paint two-three A3 pieces of paper of one colour to hang on the intended wall so I can see the effect. Once I was happy with the choice of colours, I presented my ideas to the client. Fortunately, the client was happy with them too! The colours I selected come from two very different companies: Francesca’s Paints in the UK and Bauwerk Colour from Germany. For this project I chose 20 colours from Bauwerk and 11 from Francesca’s Paints. A colour map for the house can be seen below:
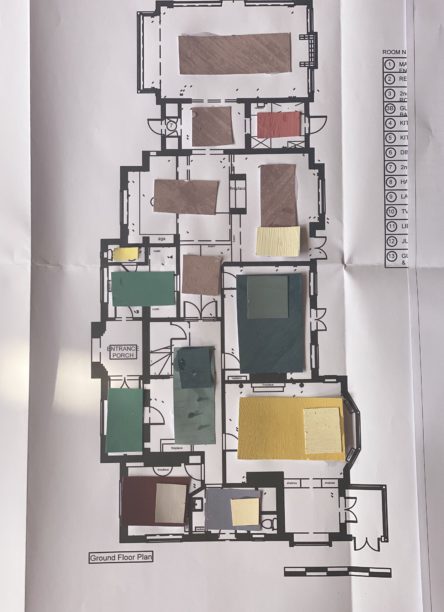
Ground Floor
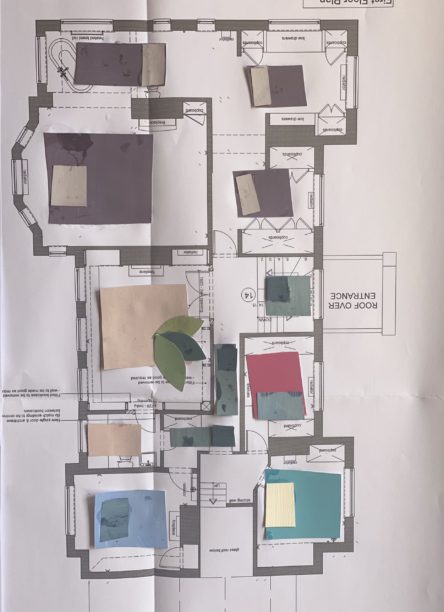
First Floor
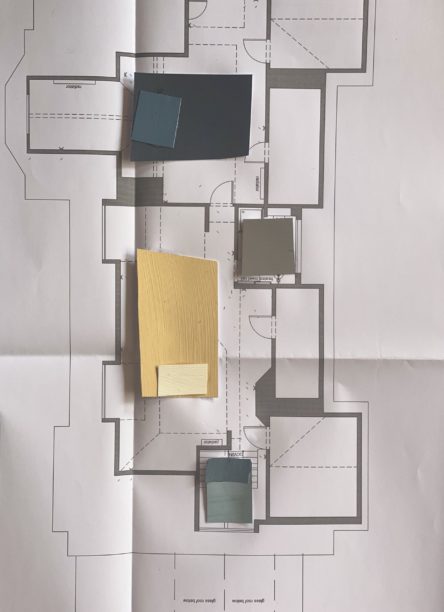
Second Floor
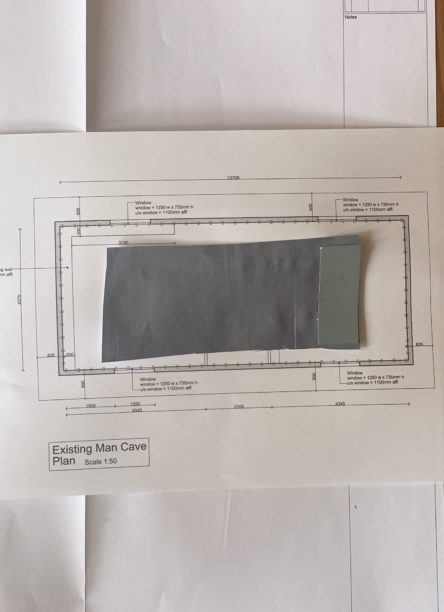
Mancave
- This client has a lot of existing furniture that they want to reuse, so my first big challenge in the design phase – and where I actually spent the most time – was to work out how to place everything. I looked at everything they had and made it fit where I believed it could enhance the general look of the house and where, to be honest, it would work. Around the client’s furniture I looked for pieces that could complement the look.
-
I needed to get ahead and get the works’ quote finalised, so I decided to finish the first phase there and make a presentation of where I was at. The client had some great ideas about furniture and pieces they wanted to move (no one knows their own furniture better than themselves) and having now presented the overall look and feel, I decided to get back to the works quote.
-
To complete the quote for the construction company, I needed to work on my electrical and lighting plans. I had made a preliminary calculation and thought about where I needed extra sockets, pendents or lights, but as this was such a huge project and my colours were quite daring, I decided to get in a lighting specialist to look over my plans. I had a great two-hour session with her; she gave me a lot of tips of what to do where.
-
I had my final inputs for the construction company to update their quote and to present it to the client for her to sign off on them. While they were working on that I went back and worked with the curtain maker to get a quote for all the curtains in the house. There are 33 windows to cover – no small feat. I needed to get a quote to know what the basics would cost even if the fabric isn’t chosen yet. This quote includes making of the curtains, the linings and the electrics for the roman blinds, but not the poles or the fabric itself.
-
Other important elements I worked on while the construction company finalised its quote was getting together quotes for the bathrooms and kitchen. I got the bathrooms approved in the first phase so I was able to go ahead and get them quoted so I could order them. Coronavirus made me nervous about how easy it would be to get these fittings, so I wanted them ordered as soon as possible. The company I wanted to use for the kitchen was based in Italy and sadly, given the crisis, they stopped responding to my emails. I had to go back to the drawing board and decided to design an island myself and get it drawn up by my team. I selected items from Gaggenau, and the kitchen shop I worked with were extremely helpful in showing me which variations of items worked best together.
-
I also started making a list of all the bespoke items that were needed so I could get them drawn up and quoted for the different suppliers I wanted to work with.
To do:
Look for movers
Order kitchen
Start building work
Order sample for fabric
Make presentation of how curtains will be – order fabric
Work on lighting and order lighting fittings
Order bespoke items
Book in decorator
Book in painting hanger
Book in installers
Book in reupholsters for the client’s furniture
Look for movers
Order kitchen
Start building work
Order sample for fabric
Make presentation of how curtains will be – order fabric
Work on lighting and order lighting fittings
Order bespoke items
Look for FF&E
Book in decorator
Book in painting hanger
Book in installers
Book in reupholsters for the client’s furniture